
Articles
Technical thoughts, tutorials, and insights
Technical thoughts, tutorials, and insights
Published on July 16, 2025

A practical guide to efficiently testing WorkManager tasks during development using App Inspection and ADB commands If you’re an Android developer who has worked with WorkManager, you’ve probably experienced this frustrating scenario: you implement a periodic task, run your app, and then… wait. And wait. And wait some more. The minimum execution interval for WorkManager is 15 minutes, which means testing your background tasks becomes a painfully slow process during development.
But what if I told you there’s a way to trigger your WorkManager tasks instantly, whenever you want, without waiting? Today, I’m going to share a development hack that has saved me countless hours of debugging time.
Before we dive into the testing hack, let’s quickly cover the fundamentals. WorkManager is Android’s recommended solution for persistent work that needs to run even when your app isn’t in the foreground. It’s perfect for tasks like uploading photos, syncing data in background, or sending analytics.
Here’s a simple example of how you might set up a WorkManager task:
class DataSyncWorker(context: Context, params: WorkerParameters) : Worker(context, params) {
    override fun doWork(): Result {
        return try {
            // Your background work here
            syncDataWithServer()
            Result.success()
        } catch (e: Exception) {
            Result.failure()
        }
    }

    private fun syncDataWithServer() {
        // Simulate API call
        Thread.sleep(2000)
        Log.d("DataSyncWorker", "Data synced successfully!")
    }
}

// In your Activity or Application class
class MainActivity : ComponentActivity() {
    override fun onCreate(savedInstanceState: Bundle?) {

        super.onCreate(savedInstanceState)

        // Dummy: Schedule the background data sync work
        scheduleDataSync()

        setContent {
            MyApp()
        }
    }

    private fun scheduleDataSync() {
        val constraints = Constraints.Builder()
            .setRequiredNetworkType(NetworkType.CONNECTED)
            .build()
        val syncWorkRequest = PeriodicWorkRequestBuilder<DataSyncWorker>(
            15, TimeUnit.MINUTES
        )
            .setConstraints(constraints)
            .addTag("data_sync")
            .build()
        WorkManager.getInstance(this)
            .enqueueUniquePeriodicWork(
                "data_sync_work",
                ExistingPeriodicWorkPolicy.KEEP,
                syncWorkRequest
            )
    }
}

@Composable
fun MyApp() {
    // Dummy Compose UI content here
    Surface(modifier = Modifier.fillMaxSize(), color = MaterialTheme.colorScheme.background) {
        Text("Hello from Compose!")
    }
}
This code creates a sample periodic worker that runs every 15 minutes when the device has network connectivity. Standard stuff that you’ll find in most WorkManager tutorials, so we do not consider whatever maybe the best practices here in this example above, just the basic recap of its working.
Here’s where the real-world development pain begins. You’ve written your worker, scheduled it, and now you want to test if it actually works. The traditional approach would be to either wait 15 minutes or create a separate one-time work request just for testing. Both approaches are inefficient and interrupt your development flow.
Many developers resort to creating separate testing methods or reducing the interval to the minimum (which is still 15 minutes). But there’s a much better way that leverages Android Studio’s powerful debugging tools.
The secret lies in understanding how WorkManager stores its tasks and combining Android Studio’s App Inspection with ADB commands. Here’s the step-by-step process that will transform your WorkManager development experience:
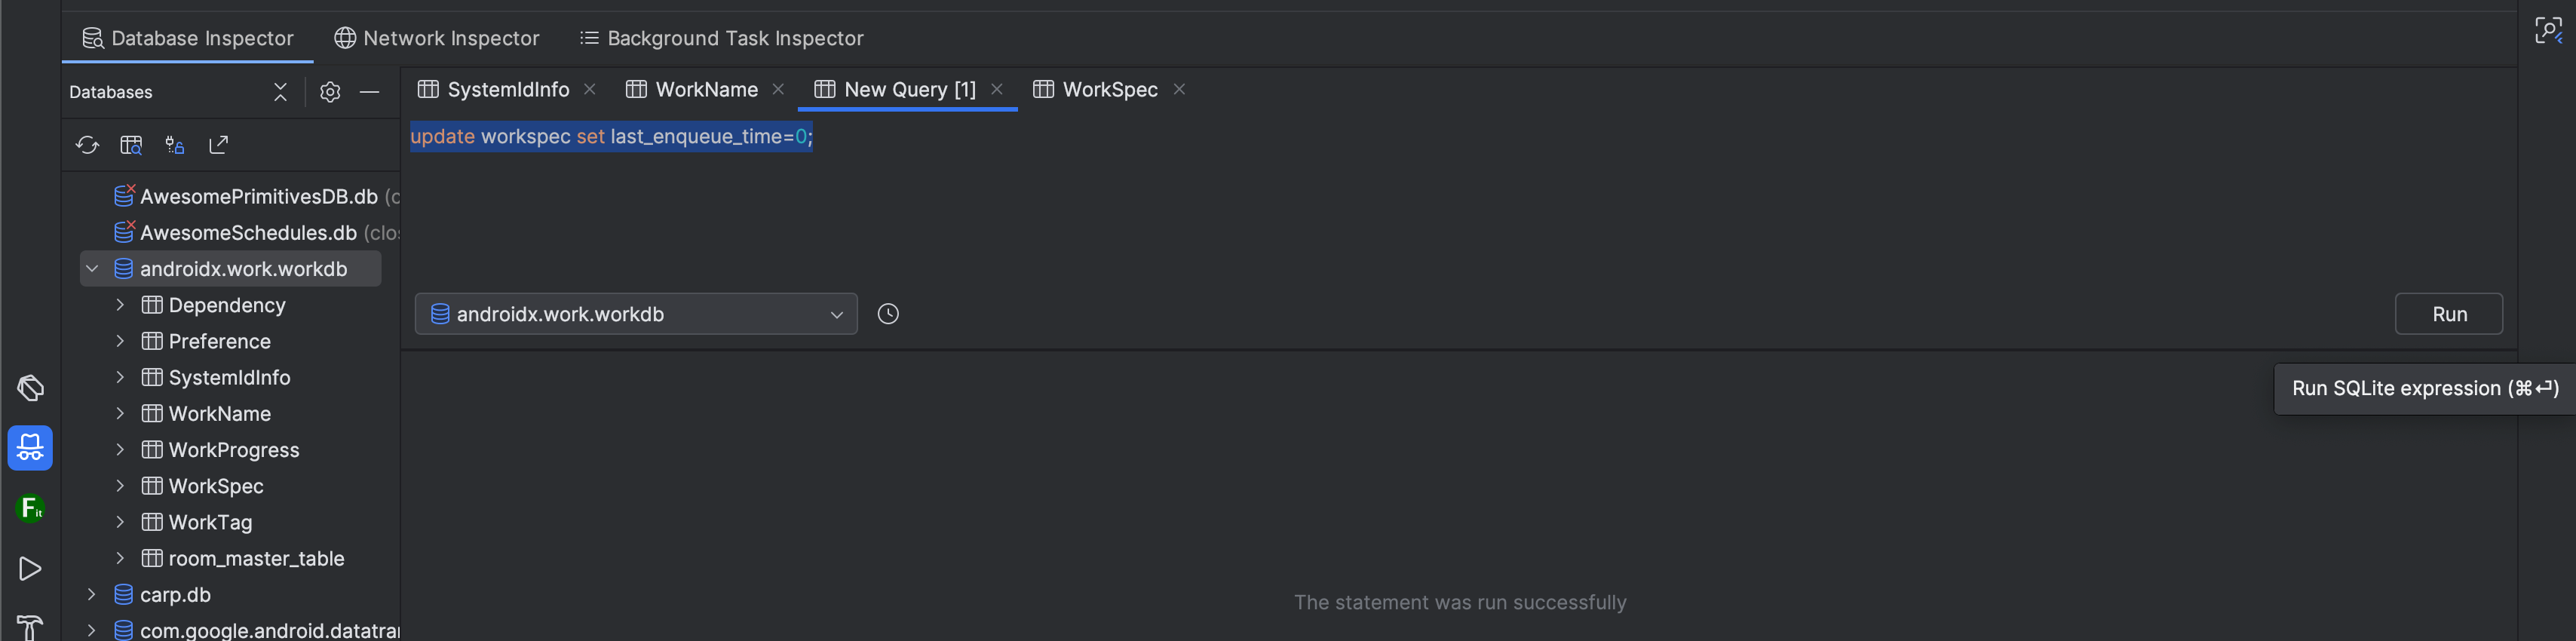
First, run your app and open Android Studio’s App Inspection tool. You’ll find it in the bottom panel or through View > Tool Windows > App Inspection. Once your app is running, navigate to the Database Inspector.
In the database list, you’ll see a database called **androidx.work.workdb **(Let’s call it workdb). This is WorkManager’s internal database where it stores all information about your scheduled tasks. Think of it as WorkManager’s memory bank where it keeps track of what needs to be done and when.
The workdb contains several important tables, but we're primarily interested in two tables:
**WorkName **:
**SystemIdInfo **:
Here’s where the magic happens. To reset a WorkManager task so it can be triggered immediately, you need to clear its execution history.
Fancy stuffs aside, the only SQL query you need to run in in the Database Inspector is :
UPDATE workspec SET last_enqueue_time=0;
 UPDATE workspec SET last_enqueue_time=0;
Above works fine but if you want to be more specific, you may run these SQL queries in the Database Inspector:
DELETE FROM WorkProgress WHERE work_spec_id = 'your_work_spec_id';
DELETE FROM WorkTag WHERE work_spec_id = 'your_work_spec_id';
UPDATE WorkSpec SET run_attempt_count = 0, last_enqueue_time = 0 WHERE id = 'your_work_spec_id';
This query essentially makes WorkManager forget that your task was ever executed, resetting it to a fresh state. Basically the hack is to reset last_enqueue_time.
To trigger your WorkManager task with ADB, you need to find the system-level task ID. Here’s how:
Look in the WorkName table and find the row where the name column matches your work name (e.g., "data_sync_work" in our above example)
Note the corresponding work_spec_id value
Go to the SystemIdInfo table and find the row with the same work_spec_id
The system_id value in that row is your task ID for the ADB command
Now comes the satisfying part. Use this ADB command to trigger your WorkManager task instantly:
adb shell cmd jobscheduler run -f <your_package_name> <task_id>
For example:
adb shell cmd jobscheduler run -f com.yourcompany.yourapp 123
Understanding why this hack works helps you appreciate its power. WorkManager uses Android’s JobScheduler under the hood for API level 23 and above. When you schedule a WorkManager task, it’s actually registered as a job with the system’s JobScheduler.
The 15-minute minimum interval is enforced by WorkManager’s internal logic. When you use the ADB command, you’re bypassing WorkManager’s timing restrictions and directly telling the JobScheduler to execute the job immediately.
By clearing the work history in the database, you’re essentially telling WorkManager that this task hasn’t been executed recently, so it won’t apply its internal cooldown logic when the system triggers it.
Here’s how this technique fits into your daily development workflow:
Write and test your Worker class logic using unit tests
Schedule your work in your app using the normal WorkManager API
Run your app and let WorkManager register the task
Open App Inspection and locate your task in the workdb
Note down the system_id for your task
Clear the work history using the SQL query
Trigger immediately using the ADB command
Repeat steps 6–7 as needed during development
For Flutter Developers: If you’re using the work_manager plugin in Flutter, the same principle applies. The plugin creates native WorkManager tasks under the hood, so you can use the same database inspection technique to find your task IDs.
Batch Operations: You can create a more comprehensive SQL query that resets multiple tasks at once:
UPDATE WorkSpec SET run_attempt_count = 0, last_enqueue_time = 0 WHERE id IN ( SELECT work_spec_id FROM WorkName WHERE name IN ('task1', 'task2', 'task3') );
Automation: Consider creating a simple shell script that combines the SQL execution and ADB command for frequently tested tasks.
While this technique is incredibly useful for development, there are some important points to keep in mind:
Development Only: This hack should never be used in production code. It’s purely a development and testing tool.
Understanding the 15-Minute Rule: If you try to trigger a WorkManager task within 15 minutes of its last execution without clearing the database, the system will simply ignore the ADB command. This is by design in WorkManager’s source code.
Database State: Remember that you’re modifying WorkManager’s internal database. Always test thoroughly after using this technique to ensure your app behaves correctly.
Multiple Devices: Each device/emulator has its own WorkManager database, so you’ll need to repeat this process for each testing environment.
WorkManager is a powerful tool for handling background work in Android, but its 15-minute minimum interval can be a significant hindrance during development. By combining Android Studio’s App Inspection with targeted ADB commands, you can take control of your testing process and trigger WorkManager tasks instantly.
This technique represents the kind of practical knowledge that separates experienced developers from beginners. It’s not about knowing every API by heart, but about understanding the underlying systems well enough to work with them more effectively.
The next time you find yourself waiting for a WorkManager task to trigger, remember this hack. Your future self will thank you for the time saved and the frustration avoided.
Did you know about this trick or Have you discovered other useful WorkManager development techniques? Share your insights